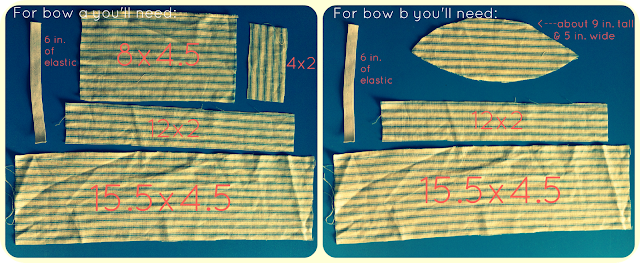
So I really just love bows and recently I have been loving headbands. I seem to have a growing collection of them both cause they're soo easy to make. So here is my version of making them!
So I'm going to do two different kinds of bows and you can just choose which one you would like to do. One is more cutesy and the other more retro-ish.
2 Do the same with the 12x2 strip but you can skip the ironing if you're lazy like me (;
3. Now slip the elastic into the thin strip you just made and sew it onto the edges. (its ok if it's messy!)
4. Now we're going to connect the two strips. fold the rough edges of the big strip inside and iron. Then fold it around the elastic strip and then sew (by hand :/).
So if you'd like, you can stop here and still have a great simple headband, or you can get creative and add the fun stuff.
Now pick which bow you'd like to make! (bow B is simpler and faster, though neither of them are complicated)
For bow A:
5. Take the 4.5x8 strip and do the same thing as in step 1.
6. and do the same with the 2x4 strip
7. Take the bigger strip and sew the rough ends together so you have a loop. 8. wrap the little strip around the flattened loop AND the headband (place the bow off to the side or in the middle as you'd like). Cut off the excess fabric and either hot or super glue it together or hand sew it. I usually just hand sew it.
For bow B:
5. sew the two oddly shaped pieces together on the edges (good side inside!)but leave an about 1 in. opening.
6. Cut off excess, turn it right-side-out and then hand sew the gap together.
7. Now simple tie it with one knot where you'd like it on your headband!
I hope you liked the tutorial! :) If you have any questions at all just comment and I'll do my best to answer!


These are adorable! I saw this on pinterest:)
ReplyDeleteI just did this out of one of my old cheetah print shirts! Came out so good thanks for the tutorial(:
ReplyDeleteSo glad it worked out! :)
DeleteI adore your DIY tutorials!
ReplyDeleteKisses from Brazil, check out my blog ;)
http://essasfrescurites.blogspot.com
So helpful!!(:
ReplyDelete